XAMPP tutorial: installation and first steps
Installing XAMPP
Our XAMPP tutorial will take you through the installation process for the software package on Windows. If you’re using Linux or Mac OS X, then the steps listed below for the installation process may differ.
Step 1: Download
XAMPP is a release made available by the non-profit project Apache Friends. Versions with PHP 5.5, 5.6, or 7 are available for download on the Apache Friends website.
Step 2: Run .exe file
Once the software bundle has been downloaded, you can start the installation by double clicking on the file with the ending .exe.
Step 3: Deactivate any antivirus software
Since an active antivirus program can negatively affect the installation process, it’s recommended to temporarily pause any antivirus software until all XAMPP components have successfully been installed.

Step 4: Deactivate UAC
User Account Control (UAC) can interfere with the XAMPP installation because it limits writing access to the C: drive, so we recommend you deactivate this too for the duration of the installation process. To find out how to turn off your UAC, head to the Microsoft Windows support pages.

Step 5: Start the setup wizard
After you’ve opened the .exe file (after deactivating your antivirus program(s) and taken note of the User Account Control, the start screen of the XAMPP setup wizard should appear automatically. Click on ‘Next’ to configure the installation settings.

Step 6: Choose software components
Under ‘Select Components’, you have the option to exclude individual components of the XAMPP software bundle from the installation. But for a full local test server, we recommend you install using the standard setup and all available components. After making your choice, click ‘Next’.

Step 7: Choose the installation directory
In this next step, you have the chance to choose where you’d like the XAMPP software packet to be installed. If you opt for the standard setup, then a folder with the name XAMPP will be created under C:\ for you. After you’ve chosen a location, click ‘Next’.

Step 8: Start the installation process
Once all the aforementioned preferences have been decided, click to start the installation. The setup wizard will unpack and install the selected components and save them to the designated directory. This process can take several minutes in total. You can follow the progress of this installation by keeping an eye on the green loading bar in the middle of the screen.

Step 9: Windows Firewall blocking
Your Firewall may interrupt the installation process to block the some components of the XAMPP. Use the corresponding check box to enable communication between the Apache server and your private network or work network. Remember that making your XAMPP server available for public networks isn’t recommended.
Step 10: Complete installation
Once all the components are unpacked and installed, you can close the setup wizard by clicking on ‘Finish’. Click to tick the corresponding check box and open the XAMPP Control Panel once the installation process is finished.

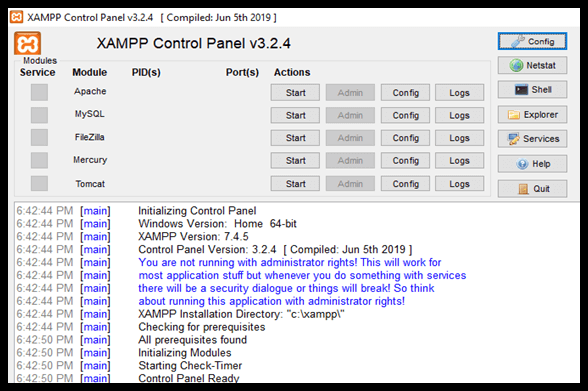
On clicking the FINISH button, the software automatically launches, and the CONTROL PANEL is visible. The image below shows the appearance of the final result.