Access PhpMyAdmin On Windows
Watch the following video to learn how to easily access phpMyAdmin on Windows through an SSH tunnel:
Once you have your SSH client correctly configured and you have confirmed that you can successfully access your instance using SSH, you need to create an SSH tunnel in order to access phpMyAdmin. Follow these steps:
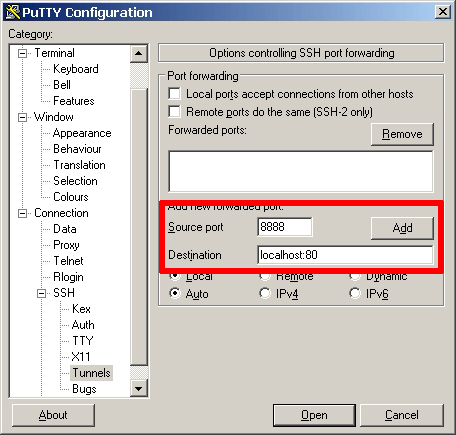
In the “Connection -> SSH -> Tunnels” section, add a new forwarded port by introducing the following values:
- Source port: 8888
- Destination: localhost:80
Remember that if you are redirecting HTTP requests to the HTTPS port, you must use destination port 443 instead of 80.
This will create a secure tunnel by forwarding a port (the “destination port”) on the remote server to a port (the “source port”) on the local host (127.0.0.1 or localhost).
Click the “Add” button to add the secure tunnel configuration to the session. You’ll see the added port in the list of “Forwarded ports”.
In the “Session” section, save your changes by clicking the “Save” button.
Click the “Open” button to open an SSH session to the server. The SSH session will now include a secure SSH tunnel between the two specified ports.
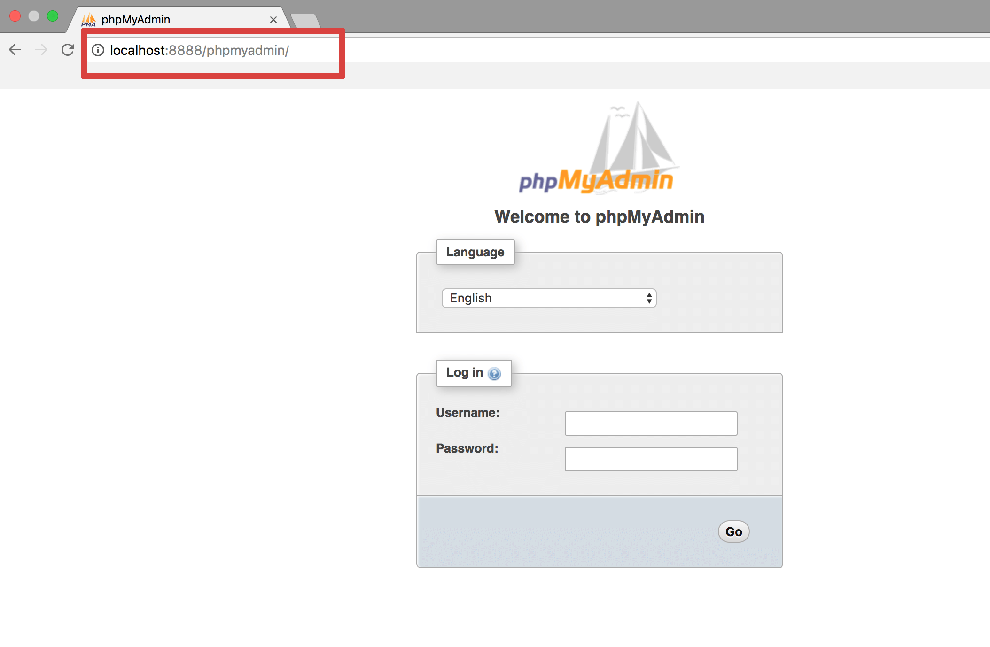
Access the phpMyAdmin console through the secure SSH tunnel you created, by browsing to http://127.0.0.1:8888/phpmyadmin.
Log in to phpMyAdmin by using the following credentials:
- Username: root
- Password: application password. (Refer to our FAQ to learn how to find your application credentials). Here is an example of what you should see:
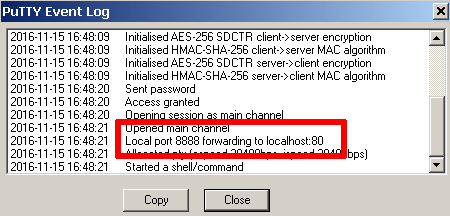
If you are unable to access phpMyAdmin, verify that the SSH tunnel was created by checking the PuTTY event log (accessible via the “Event Log” menu):
Access PhpMyAdmin On Linux And MacOS
To access the application using your Web browser, create an SSH tunnel, as described below.
Open a new terminal window on your local system (for example, using “Finder -> Applications -> Utilities -> Terminal” in macOS or the Dash in Ubuntu).
Make sure that you have your SSH credentials (.pem key file) in hand.
Run the following command to configure the SSH tunnel using the SSH key file. Remember to replace KEYFILE with the path to your private key and SERVER-IP with the public IP address or hostname of your server:
ssh -N -L 8888:127.0.0.1:80 -i KEYFILE bitnami@SERVER-IPRun the following command to configure the SSH tunnel using the SSH password, remembering to replace SERVER-IP with the public IP address or hostname of your server. Enter your SSH password when prompted.
ssh -N -L 8888:127.0.0.1:80 bitnami@SERVER-IPRemember that if you are redirecting HTTP requests to the HTTPS port, you must use destination port 443 instead of 80.
NOTE: If successful, the above command will create an SSH tunnel but will not display any output on the server console.
Access the phpMyAdmin console through the secure SSH tunnel you created, by browsing to http://127.0.0.1:8888/phpmyadmin.
Log in to phpMyAdmin by using the following credentials:
- Username: root
- Password: application password. (Refer to our FAQ to learn how to find your application credentials).
Here is an example of what you should see: